1.封装网络(使用SDWebImage和AFNetworking框架)下载图片

程序启动的时候就会调用,需要先在这个方法中开始监测网络

1
2
3
4
5
6
- (BOOL)application:(UIApplication *)application didFinishLaunchingWithOptions:(NSDictionary *)launchOptions {
// 监控网络状况
[[AFNetworkReachabilityManager sharedManager] startMonitoring];
}
1
2
3
4
5
6
7
8
9
10
11
12
13
14
15
16
17
18
19
20
21
22
23
24
25
26
27
28
29
30
31
32
33
34
35
36
37
38
39
40
41
42
43
44
45
46
47
48
49
50
51
52
53
54
55
56
57
58
59
60
61
#import <UIKit/UIKit.h>
#import <UIImageView+WebCache.h>
@interface UIImageView (Download)
- (void)xy_setOriginImage:(NSString *)originImageURL thumbnailImage:(NSString *)thumbnailImageURL placeholder:(UIImage *)placeholder completed:(SDWebImageCompletionBlock)completedBlock;
- (void)xy_setHeader:(NSString *)headerUrl;
@end
#import "UIImageView+Download.h"
#import <AFNetworkReachabilityManager.h>
#import <UIImageView+WebCache.h>
@implementation UIImageView (Download)
- (void)xy_setOriginImage:(NSString *)originImageURL thumbnailImage:(NSString *)thumbnailImageURL placeholder:(UIImage *)placeholder completed:(SDWebImageCompletionBlock)completedBlock
{
// 根据网络状态来加载图片
AFNetworkReachabilityManager *mgr = [AFNetworkReachabilityManager sharedManager];
// 获得原图(SDWebImage的图片缓存是用图片的url字符串作为key)
UIImage *originImage = [[SDImageCache sharedImageCache] imageFromDiskCacheForKey:originImageURL];
if (originImage) { // 原图已经被下载过
[self sd_setImageWithURL:[NSURL URLWithString:originImageURL] placeholderImage:placeholder completed:completedBlock];
} else { // 原图并未下载过
if (mgr.isReachableViaWiFi) {
[self sd_setImageWithURL:[NSURL URLWithString:originImageURL] placeholderImage:placeholder completed:completedBlock];
} else if (mgr.isReachableViaWWAN) {
// 3G\4G网络下时候要下载原图
BOOL downloadOriginImageWhen3GOr4G = YES;
if (downloadOriginImageWhen3GOr4G) {
[self sd_setImageWithURL:[NSURL URLWithString:originImageURL] placeholderImage:placeholder completed:completedBlock];
} else {
[self sd_setImageWithURL:[NSURL URLWithString:thumbnailImageURL] placeholderImage:placeholder completed:completedBlock];
}
} else { // 没有可用网络
UIImage *thumbnailImage = [[SDImageCache sharedImageCache] imageFromDiskCacheForKey:thumbnailImageURL];
if (thumbnailImage) { // 缩略图已经被下载过
[self sd_setImageWithURL:[NSURL URLWithString:thumbnailImageURL] placeholderImage:placeholder completed:completedBlock];
} else { // 没有下载过任何图片
// 占位图片;
[self sd_setImageWithURL:nil placeholderImage:placeholder completed:completedBlock];
}
}
}
}
- (void)xy_setHeader:(NSString *)headerUrl
{
UIImage *placeholder = [UIImage xy_circleImageNamed:@"defaultUserIcon"];
[self sd_setImageWithURL:[NSURL URLWithString:headerUrl] placeholderImage:placeholder options:0 completed:^(UIImage *image, NSError *error, SDImageCacheType cacheType, NSURL *imageURL) {
// 图片下载失败,直接返回,按照它的默认做法
if (!image) return;
self.image = [image xy_circleImage];
}];
}
@end

1
2
3
4
5
6
7
8
9
10
11
12
13
14
15
16
17
18
19
20
21
22
23
24
25
26
27
28
29
30
31
32
33
34
35
36
37
38
39
40
41
42
43
44
45
46
47
48
49
50
51
52
53
54
55
56
57
58
59
60
61
62
63
64
65
66
67
#import <UIKit/UIKit.h>
@interface UIBarButtonItem (Items)
/** 图片 高亮图片 */
+ (UIBarButtonItem *)itemWithImage:(UIImage *)image heghImage:(UIImage *)heghImage target:(id)target action:(SEL)action;
/** 图片 选择图片 */
+ (UIBarButtonItem *)itemWithImage:(UIImage *)image selImage:(UIImage *)selImage target:(id)target action:(SEL)action;
/** 图片 高亮图片 标题*/
+ (UIBarButtonItem *)itemWithImage:(UIImage *)image heghImage:(UIImage *)heghImage target:(id)target action:(SEL)action title:(NSString *)title;
@end
#import "UIBarButtonItem+Items.h"
@implementation UIBarButtonItem (Items)
/** 图片 高亮图片 */
+ (UIBarButtonItem *)itemWithImage:(UIImage *)image selImage:(UIImage *)selImage target:(id)target action:(SEL)action
{
UIButton *btn = [UIButton buttonWithType:UIButtonTypeCustom];
[btn setImage:image forState:UIControlStateNormal];
[btn setImage:selImage forState:UIControlStateSelected];
[btn addTarget:target action:action forControlEvents:UIControlEventTouchUpInside];
[btn sizeToFit];
UIView *contantView = [[UIView alloc] init];
contantView.frame = btn.bounds;
[contantView addSubview:btn];
return [[UIBarButtonItem alloc] initWithCustomView:contantView];
}
/** 图片 选择图片 */
+ (UIBarButtonItem *)itemWithImage:(UIImage *)image heghImage:(UIImage *)heghImage target:(id)target action:(SEL)action
{
UIButton *btn = [UIButton buttonWithType:UIButtonTypeCustom];
[btn setImage:image forState:UIControlStateNormal];
[btn setImage:heghImage forState:UIControlStateSelected];
[btn addTarget:target action:action forControlEvents:UIControlEventTouchUpInside];
[btn sizeToFit];
UIView *contantView = [[UIView alloc] init];
contantView.frame = btn.bounds;
[contantView addSubview:btn];
return [[UIBarButtonItem alloc] initWithCustomView:contantView];
}
/** 图片 高亮图片 标题*/
+ (UIBarButtonItem *)itemWithImage:(UIImage *)image heghImage:(UIImage *)heghImage target:(id)target action:(SEL)action title:(NSString *)title
{
UIButton *btn = [UIButton buttonWithType:UIButtonTypeCustom];
[btn setImage:image forState:UIControlStateNormal];
[btn setImage:heghImage forState:UIControlStateHighlighted];
[btn addTarget:target action:action forControlEvents:UIControlEventTouchUpInside];
[btn setTitle:title forState:UIControlStateNormal];
[btn setTitleColor:[UIColor blackColor] forState:UIControlStateNormal];
[btn setTitleColor:[UIColor redColor] forState:UIControlStateHighlighted];
[btn sizeToFit];
btn.contentEdgeInsets = UIEdgeInsetsMake(0, -20, 0, 0);
UIView *contantView = [[UIView alloc] init];
contantView.frame = btn.bounds;
[contantView addSubview:btn];
return [[UIBarButtonItem alloc] initWithCustomView:contantView];
}
@end

1
2
3
4
5
6
7
8
9
10
11
12
13
14
15
16
17
18
19
20
21
22
23
24
25
26
27
28
29
30
31
32
33
34
35
36
37
38
39
40
41
42
43
44
45
46
47
48
49
50
51
52
53
54
55
56
57
58
59
60
61
62
63
64
65
66
67
68
69
70
71
72
73
74
75
76
77
78
79
80
81
82
83
84
#import <UIKit/UIKit.h>
@interface UIView (Frame)
@property (nonatomic, assign) CGFloat xy_x;
@property (nonatomic, assign) CGFloat xy_y;
@property (nonatomic, assign) CGFloat xy_width;
@property (nonatomic, assign) CGFloat xy_height;
@property (nonatomic, assign) CGFloat centerX;
@property (nonatomic, assign) CGFloat centerY;
@end
#import "UIView+Frame.h"
@implementation UIView (Frame)
- (void)setXy_x:(CGFloat)xy_x
{
CGRect frame = self.frame;
frame.origin.x = xy_x;
self.frame = frame;
}
- (CGFloat)xy_x
{
return self.frame.origin.x;
}
- (void)setXy_y:(CGFloat)xy_y
{
CGRect frame = self.frame;
frame.origin.y = xy_y;
self.frame = frame;
}
- (CGFloat)xy_y
{
return self.frame.origin.y;
}
- (void)setXy_width:(CGFloat)xy_width
{
CGRect frame = self.frame;
frame.size.width = xy_width;
self.frame = frame;
}
- (CGFloat)xy_width
{
return self.frame.size.width;
}
- (void)setXy_height:(CGFloat)xy_height
{
CGRect frame = self.frame;
frame.size.height = xy_height;
self.frame = frame;
}
- (CGFloat)xy_height
{
return self.frame.size.height;
}
- (void)setCenterX:(CGFloat)centerX
{
CGPoint center = self.center;
center.x = centerX;
self.center = center;
}
- (CGFloat)centerX
{
return self.center.x;
}
- (void)setCenterY:(CGFloat)centerY
{
CGPoint center = self.center;
center.y = centerY;
self.center = center;
}
- (CGFloat)centerY
{
return self.center.y;
}
@end

UIImage相关扩展

1.裁剪成圆形(头像使用较多)

1
2
3
4
5
6
7
8
9
10
11
12
13
14
15
16
17
18
19
20
21
22
23
24
- (instancetype)xmg_circleImage
{
// 1.开启图形上下文
// 比例因素:当前点与像素比例
UIGraphicsBeginImageContextWithOptions(self.size, NO, 0);
// 2.描述裁剪区域
UIBezierPath *path = [UIBezierPath bezierPathWithOvalInRect:CGRectMake(0, 0, self.size.width, self.size.height)];
// 3.设置裁剪区域;
[path addClip];
// 4.画图片
[self drawAtPoint:CGPointZero];
// 5.取出图片
UIImage *image = UIGraphicsGetImageFromCurrentImageContext();
// 6.关闭上下文
UIGraphicsEndImageContext();
return image;
}
+ (instancetype)xmg_circleImageNamed:(NSString *)name
{
return [[self imageNamed:name] xmg_circleImage];
}
@end

2.在某些地方加载出来的图片是经过系统渲染过的,该方法是告诉系统不需要渲染加载的图片

1
2
3
4
+ (instancetype)xmg_circleImageNamed:(NSString *)name
{
return [[self imageNamed:name] xmg_circleImage];
}

3.返回一张抗锯齿图片(本质:在图片周边加一个边框为1的透明像素)

1
2
3
4
5
6
7
8
9
10
11
12
13
14
15
16
17
18
19
- (UIImage *)imageAntialias
{
CGFloat border = 1.0f;
CGRect rect = CGRectMake(border, border, self.size.width-2*border, self.size.height-2*border);
UIImage *img = nil;
UIGraphicsBeginImageContext(CGSizeMake(rect.size.width,rect.size.height));
[self drawInRect:CGRectMake(-1, -1, self.size.width, self.size.height)];
img = UIGraphicsGetImageFromCurrentImageContext();
UIGraphicsEndImageContext();
UIGraphicsBeginImageContext(self.size);
[img drawInRect:rect];
UIImage* antiImage = UIGraphicsGetImageFromCurrentImageContext();
UIGraphicsEndImageContext();
return antiImage;
}

1.封装网络请求工具类

`XYNetManager.h文件中`
#import <Foundation/Foundation.h>

#define kCompletionHandle completionHandle:(void(^)(id model, NSError *error))completionHandle;

@interface XYNetManager : NSObject

/** 对AFHTTPSessionManager的GET请求方法进行了封装 */
+ (id)GET:(NSString *)path parameters:(NSDictionary *)params completionHandler:    (void(^)(id responseObj, NSError *error))complete;

/** 对AFHTTPSessionManager的POST请求方法进行了封装 */
+ (id)POST:(NSString *)path parameters:(NSDictionary *)params completionHandler:    (void(^)(id responseObj, NSError *error))complete;

/**
 *  为了应付某些服务器对于中文字符串不支持的情况,需要转化字符串为带有%号形势
 *
 *  @param path   请求的路径,即 ? 前面部分
 *  @param params 请求的参数,即 ? 号后面部分
 *
 *  @return 转化 路径+参数 拼接出的字符串中的中文为 % 号形势
 */
+ (NSString *)percentPathWithPath:(NSString *)path params:(NSDictionary *)params;
@end


`XYNetManager.m文件中`
#import "XYNetManager.h"


static AFHTTPSessionManager *manager = nil;

@implementation XYNetManager

+ (AFHTTPSessionManager *)sharedAFManager{
    static dispatch_once_t onceToken;
    dispatch_once(&onceToken, ^{
            manager = [AFHTTPSessionManager manager];
        // 此处添加了 @"text/plain"   这样才能够解析
        manager.responseSerializer.acceptableContentTypes = [NSSet     setWithObjects:@"text/html", @"application/json", @"text/json", @"text/javascript",     @"text/plain", nil];
    });
    return manager;
}

//http://cache.tuwan.com/app/?appid=1&class=heronews&mod=八卦&appid=1&appver=2.1
/* URL的结构是 ? 号之前是地址, ?号之后是参数
 path:http://cache.tuwan.com/app/
 params:@{@"appid":@1, @"class":@"heronews", @"mod":@"八卦", @"appver":@2.1}
 */
//方法:把path和参数拼接起来,把字符串中的中文转换为 百分号 形势,因为有的服务器不接收中文编码
+ (NSString *)percentPathWithPath:(NSString *)path params:(NSDictionary *)params{
    NSMutableString *percentPath =[NSMutableString stringWithString:path];
    NSArray *keys = params.allKeys;
    NSInteger count = keys.count;
    /*  习惯
     for(int i = 0; i < params.allKeys.count; i ++)
     假设for循环循环1000次,params.allKeys实际上调用的[params allKeys], 会调用allKeys1000    次。 OC语言特性是runtime,实际上我们调用一个方法,底层操作是有两个列有方法的列表,常用表和总列表。    CPU先在常用表中搜索调用的方法指针,如果找不到,再到总列表中搜索。 在总列表中搜索你调用的方法所在的地    址,然后调用完毕之后把这个方法名转移到常用方法列表。如果再次执行某个方法就在常用方法列表中搜索调用,    效率更高。但是毕竟每次搜索方法都是耗时的,而swift语言则没有运行时,即没有这个搜索过程。 这是swift比    oc效率高20%的原因。 为了避免搜索耗时,我们在for循环外部就把调用次数算出来,这样每次for循环只需要去    count所在地址读变量值即可。 这样for循环效率更高。
     */
    for (int i = 0; i < count; i++) {
        if (i == 0) {
            [percentPath appendFormat:@"?%@=%@", keys[i], params[keys[i]]];
        }else{
            [percentPath appendFormat:@"&%@=%@", keys[i], params[keys[i]]];
        }
    }
    //把字符串中的中文转为%号形势
    return [percentPath     stringByAddingPercentEscapesUsingEncoding:NSUTF8StringEncoding];
}

+ (id)GET:(NSString *)path parameters:(NSDictionary *)params completionHandler:    (void(^)(id responseObj, NSError *error))complete{

    return [[self sharedAFManager] GET:path parameters:params progress:nil     success:^(NSURLSessionDataTask * _Nonnull task, id  _Nullable responseObject) {

        complete(responseObject, nil);
    } failure:^(NSURLSessionDataTask * _Nullable task, NSError * _Nonnull error) {

        complete(nil, error);
    }];
}

+ (id)POST:(NSString *)path parameters:(NSDictionary *)params completionHandler:    (void(^)(id responseObj, NSError *error))complete{

    return [[self sharedAFManager] POST:path parameters:params progress:nil     success:^(NSURLSessionDataTask * _Nonnull task, id  _Nullable responseObject) {

        complete(responseObject, nil);
    } failure:^(NSURLSessionDataTask * _Nullable task, NSError * _Nonnull error) {

        complete(nil, error);
    }];
}

@end

1.每个cell之间有固定的间距

cell样例

###在自定义cell的.m文件中重写

- (void)setFrame:(CGRect)frame
{
    frame.size.height -= XMGMarin;

    [super setFrame:frame];
}

XYConst.h文件中声明(学习官方常量的定义)

#import <UIKit/UIKit.h>

/** 导航栏的最大Y值 */
UIKIT_EXTERN CGFloat const XYNavMaxY;

/** 标题栏的高度 */
UIKIT_EXTERN CGFloat const XYTitlesViewH;

/** tabBar的高度 */
UIKIT_EXTERN CGFloat const XYTabBarH;
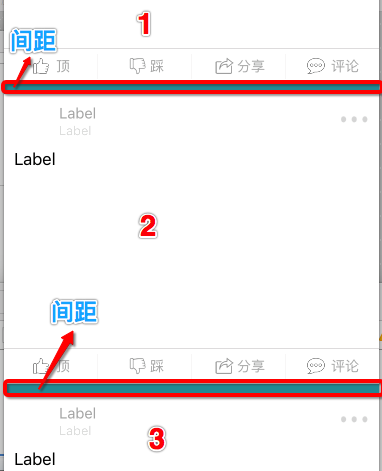
/** 全局统一的间距 */
UIKIT_EXTERN CGFloat const XYMargin;

/** tabbarbutton重复点击 */
UIKIT_EXTERN NSString * const XYTabBarButtonDidClickRepeatNotification;

/** 标题按钮重复点击 */
UIKIT_EXTERN NSString * const XYTitleButtonDidRepeatClick;

XYConst.m中实现

#import <UIKit/UIKit.h>

/** 导航栏的最大Y值 */
CGFloat const XYNavMaxY = 64;

/** 标题栏的高度 */
CGFloat const XYTitlesViewH = 35;

/** tabBar的高度 */
CGFloat const XYTabBarH = 49;

/** 全局统一的间距 */
CGFloat const XYMargin = 10;

/** tabbarbutton重复点击 */
NSString * const XYTabBarButtonDidClickRepeatNotification =     @"XYTabBarButtonDidClickRepeatNotification";

/** 标题按钮重复点击 */
NSString * const XYTitleButtonDidRepeatClick = @"XYTitleButtonDidRepeatClick";    

1.KRVideoPlayer框架 播放视频(适用于全屏播放)

在监听点击事件中

pod "KRVideoPlayer"

- (IBAction)playRemoteVideo:(id)sender
{//    demo 中的示例代码
    NSURL *videoURL = [NSURL URLWithString:@"http://krtv.qiniudn.com/150522nextapp"];

if (!self.videoController) {
    CGFloat width = [UIScreen mainScreen].bounds.size.width;
    CGFloat height = [UIScreen mainScreen].bounds.size.height;
    self.videoController = [[KRVideoPlayerController alloc] initWithFrame:CGRectMake(0, 0, width, width*(9.0/16.0))];

    __weak typeof(self)weakSelf = self;
    [self.videoController setDimissCompleteBlock:^{
        weakSelf.videoController = nil;
    }];
    [self.videoController showInWindow];
}

self.videoController.contentURL = videoURL;

}

2.BarrageRenderer框架 播放视频(一个 iOS 上的开源弹幕渲染库)

github链接

弹幕效果图

1.验证是否为身份证号码
1
2
3
4
5
6
7
8
9
10
11
12
13
14
15
16
17
18
19
20
21
22
23
24
25
26
27
28
29
30
31
32
33
34
35
36
37
38
39
40
41
42
43
44
+ (BOOL)isCardID:(NSString *)vText
{
NSString* sxString =
@"^[1-9]\\d{5}[1-9]\\d{3}((0\\d)|(1[0-2]))(([0|1|2]\\d)|3[0-1])((\\d{4})|\\d{3}[Xx])$";
NSPredicate *regextestmobile = [NSPredicate predicateWithFormat:@"SELF MATCHES %@", sxString];
if([regextestmobile evaluateWithObject:vText]){
NSArray *Wi = @[@"7",@"9",@"10",@"5",@"8",@"4",@"2",@"1",@"6",@"3",@"7",@"9",@"10",@"5",@"8",@"4",@"2"];
NSInteger num = 0;
for(int i = 0 ; i < Wi.count ; i++){
NSString *temp = [vText substringWithRange:NSMakeRange(i, 1)];
NSString *wiString = Wi[i];
num += [temp integerValue]*[wiString integerValue];
}
NSInteger result = num%11;
NSArray *y = @[@"1",@"0",@"10",@"9",@"8",@"7",@"6",@"5",@"4",@"3",@"2"];
if(result == 2)
{
NSString *temp = [vText substringWithRange:NSMakeRange(17, 1)];
if([temp isEqualToString:@"x"]|| [temp isEqualToString:@"X"]) return YES;
else return NO;
}else{
NSString *temp = [vText substringWithRange:NSMakeRange(17, 1)];
return [temp isEqualToString:y[result]];
}
}else{
return [regextestmobile evaluateWithObject:vText];
}
}

1.需要安装的应用程序

  • node.js 地址

  • 集成git,安装xcode即可

  • 安装hexo

    终端输入 $ sudo npm install -g hexo-cli(sudo 执行管理员权限)

2.使用Hexo来显示博客

创建一个文件夹(blogxxx)(所有命令都是在该文件中)
  • 进入到根目录执行命令
    • cd blogxxx
    • hexo init
    • npm install
    • hexo s (运行hexo,以后要在本地运行博客只要输入该命令即可)
    • Ctrl+C(停止运行)

配置_config.yml文件

(1).显示图片的方法,使用asset-image:
  • cd到文件目录下,执行 npm install https://github.com/CodeFalling/hexo-asset-image –save
  • 修改_config.yml 中有 post_asset_folder:true
  • 在source/_posts中创建一个xxx.md文件同名的文件夹xxx,该xxx文件夹放入xxx.md文件中使用到的图片,在xxx.md中引用图片方式为:![图片名称](xxx/图片名称带格式后缀)
(2).主题
  • git clone https://github.com/wuchong/jacman.git themes/jacman
    • jacman文件夹下,从终端进入删除掉相关的.git和.gitignore文件
    • 在_config.yml文件中搜索theme,将theme:xxx设置为 theme: jacman(主题名)

3.关联github仓库的链接

  • 在_config.yml文件中 ,将deploy改为
    • type: git
    • repository: 仓库链接
    • branch: master(分支)

###关键步骤:关联命令

  • npm install hexo-deployer-git –save

设置url

  • _config.yml 文件中的 http://yoursite.com 替换为 http://仓库名.github.io

hexo 相关命令

设置git身份信息

  • git config –global user.name “你的用户名”

  • git config –global user.email “你的邮箱”

  • hexo clean 清理

  • hexo g 生成静态站点(位于public目录)

  • hexo deploy 发布

  • hexo deploy –generate 生成静态站点并发布

hexo的哪些文件需要上传到github上

####hexo/

  • 不需要上传
    • public/ 生成的静态页面,由hexo deploy自动上传到gh-page分支
    • node_modules/ hexo需要的模块,不需要上传GitHub
    • package.json 记录hexo需要的包信息,不需要上传GitHub
    • .gitignore hexo生成默认的.gitignore,它已经配置好了不需要上传的hexo文件
  • 需要上传
    • themes/ 主题文件,需要上传GitHub的dev分支
    • source/ 博文md文件,需要上传GitHub的dev分支
    • _config.yml 全局配置文件,需要上传GitHub的dev分支